Fear acclimation via height exposure – a practical application

Fear acclimation via height exposure – a practical application

In a photoshoot for ParkourWave in 2012, Mestre (Venice), Italy. By the skilled Davide “Crowley” Vianello, from AptaParkour.

*

So far in this fear management journey via height exposure, we have seen a series of theoretical key points. Just in case you are joining just now, let me summarize them very briefly: 

  1. Fear is an automatic mechanism, it is a friend and a companion that can help us discriminating dangerous situations from those that are safe. Even though we cannot change the effects fear has on our bodies, our preparedness levels can increase our ability to confront it.

Click here for the “introduction to fear management” article

  1. When we consider Fear exposure and preparedness, there is only a limited number of situation that can allow growth. Below or over that stage, there is either comfort or danger and nothing relevant can be learned from it. Therefore, you have to learn how to pick the right scenario for development.

 Click here to read about the “fear preparedness matrix”

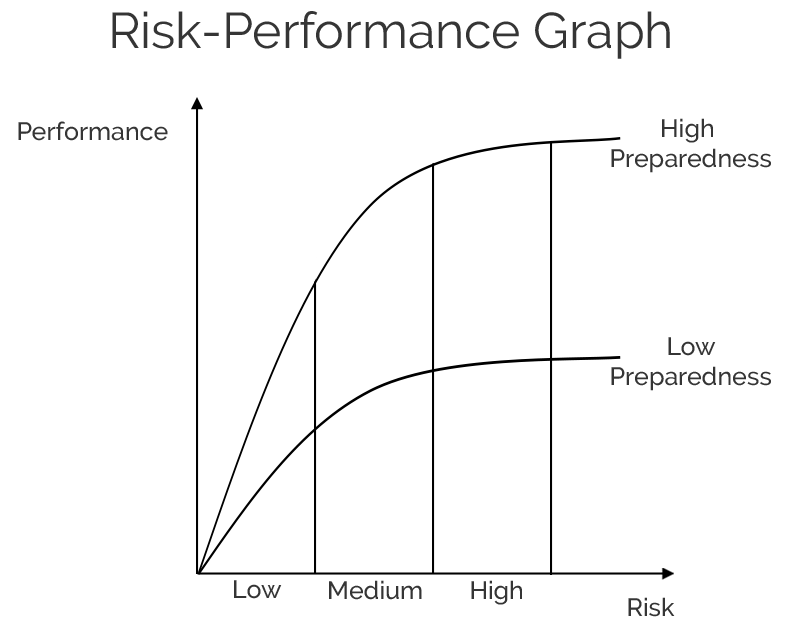
3. For a given risk, only one performance outcome is possible, and that is related to the individual level of preparedness in that specific circumstance. The idea that everybody can do anything without adjusting risk to preparedness is just an illusion.

Click here to find out what the “risk illusion” is

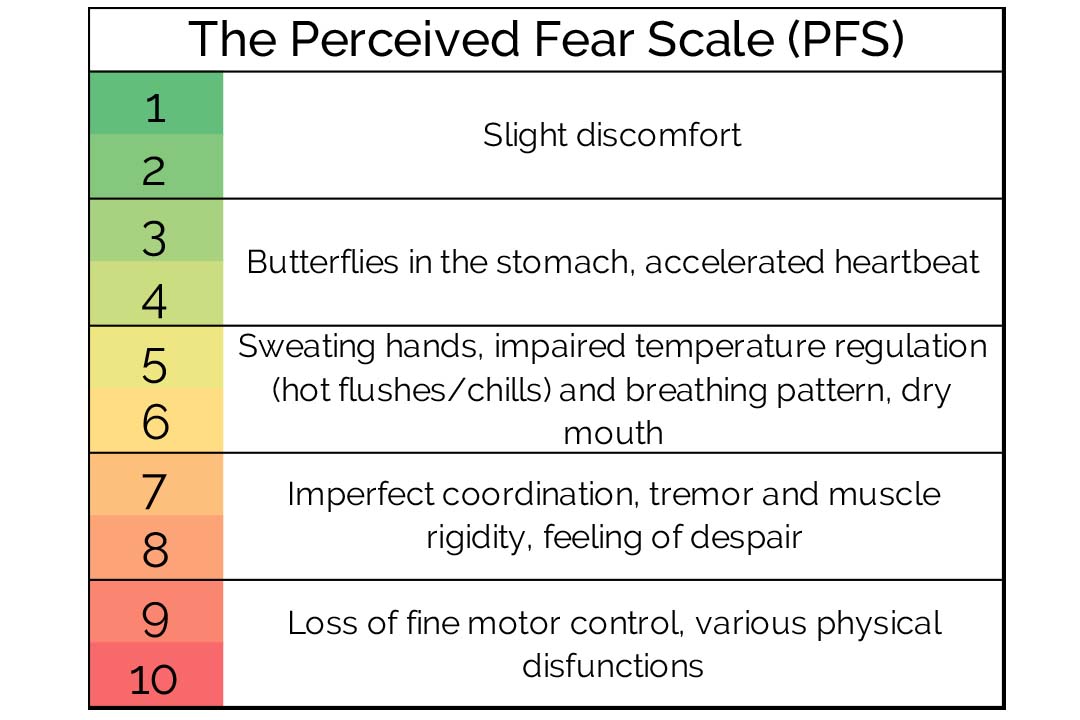
  1. Humans’ perceptions and instincts are inner signals that can and should be trusted (once tuned). I have developed a scale to identify the severity of fear’s symptoms called the “Perceived Fear Scale” (PFS). Know the scale, know yourself, leave little to nothing to chance.

Click here for check the perceived fear scale

Make sure those points are as clear as the sun before moving on. If not, go back into the articles; read them thoroughly and let the understanding sink in.


Now, a question will be pending out of your tongue: in practice, how can I identify and scale those situations to the right level? If you manage to do that and go through the right process of development everything can become possible.

So, let’s start:

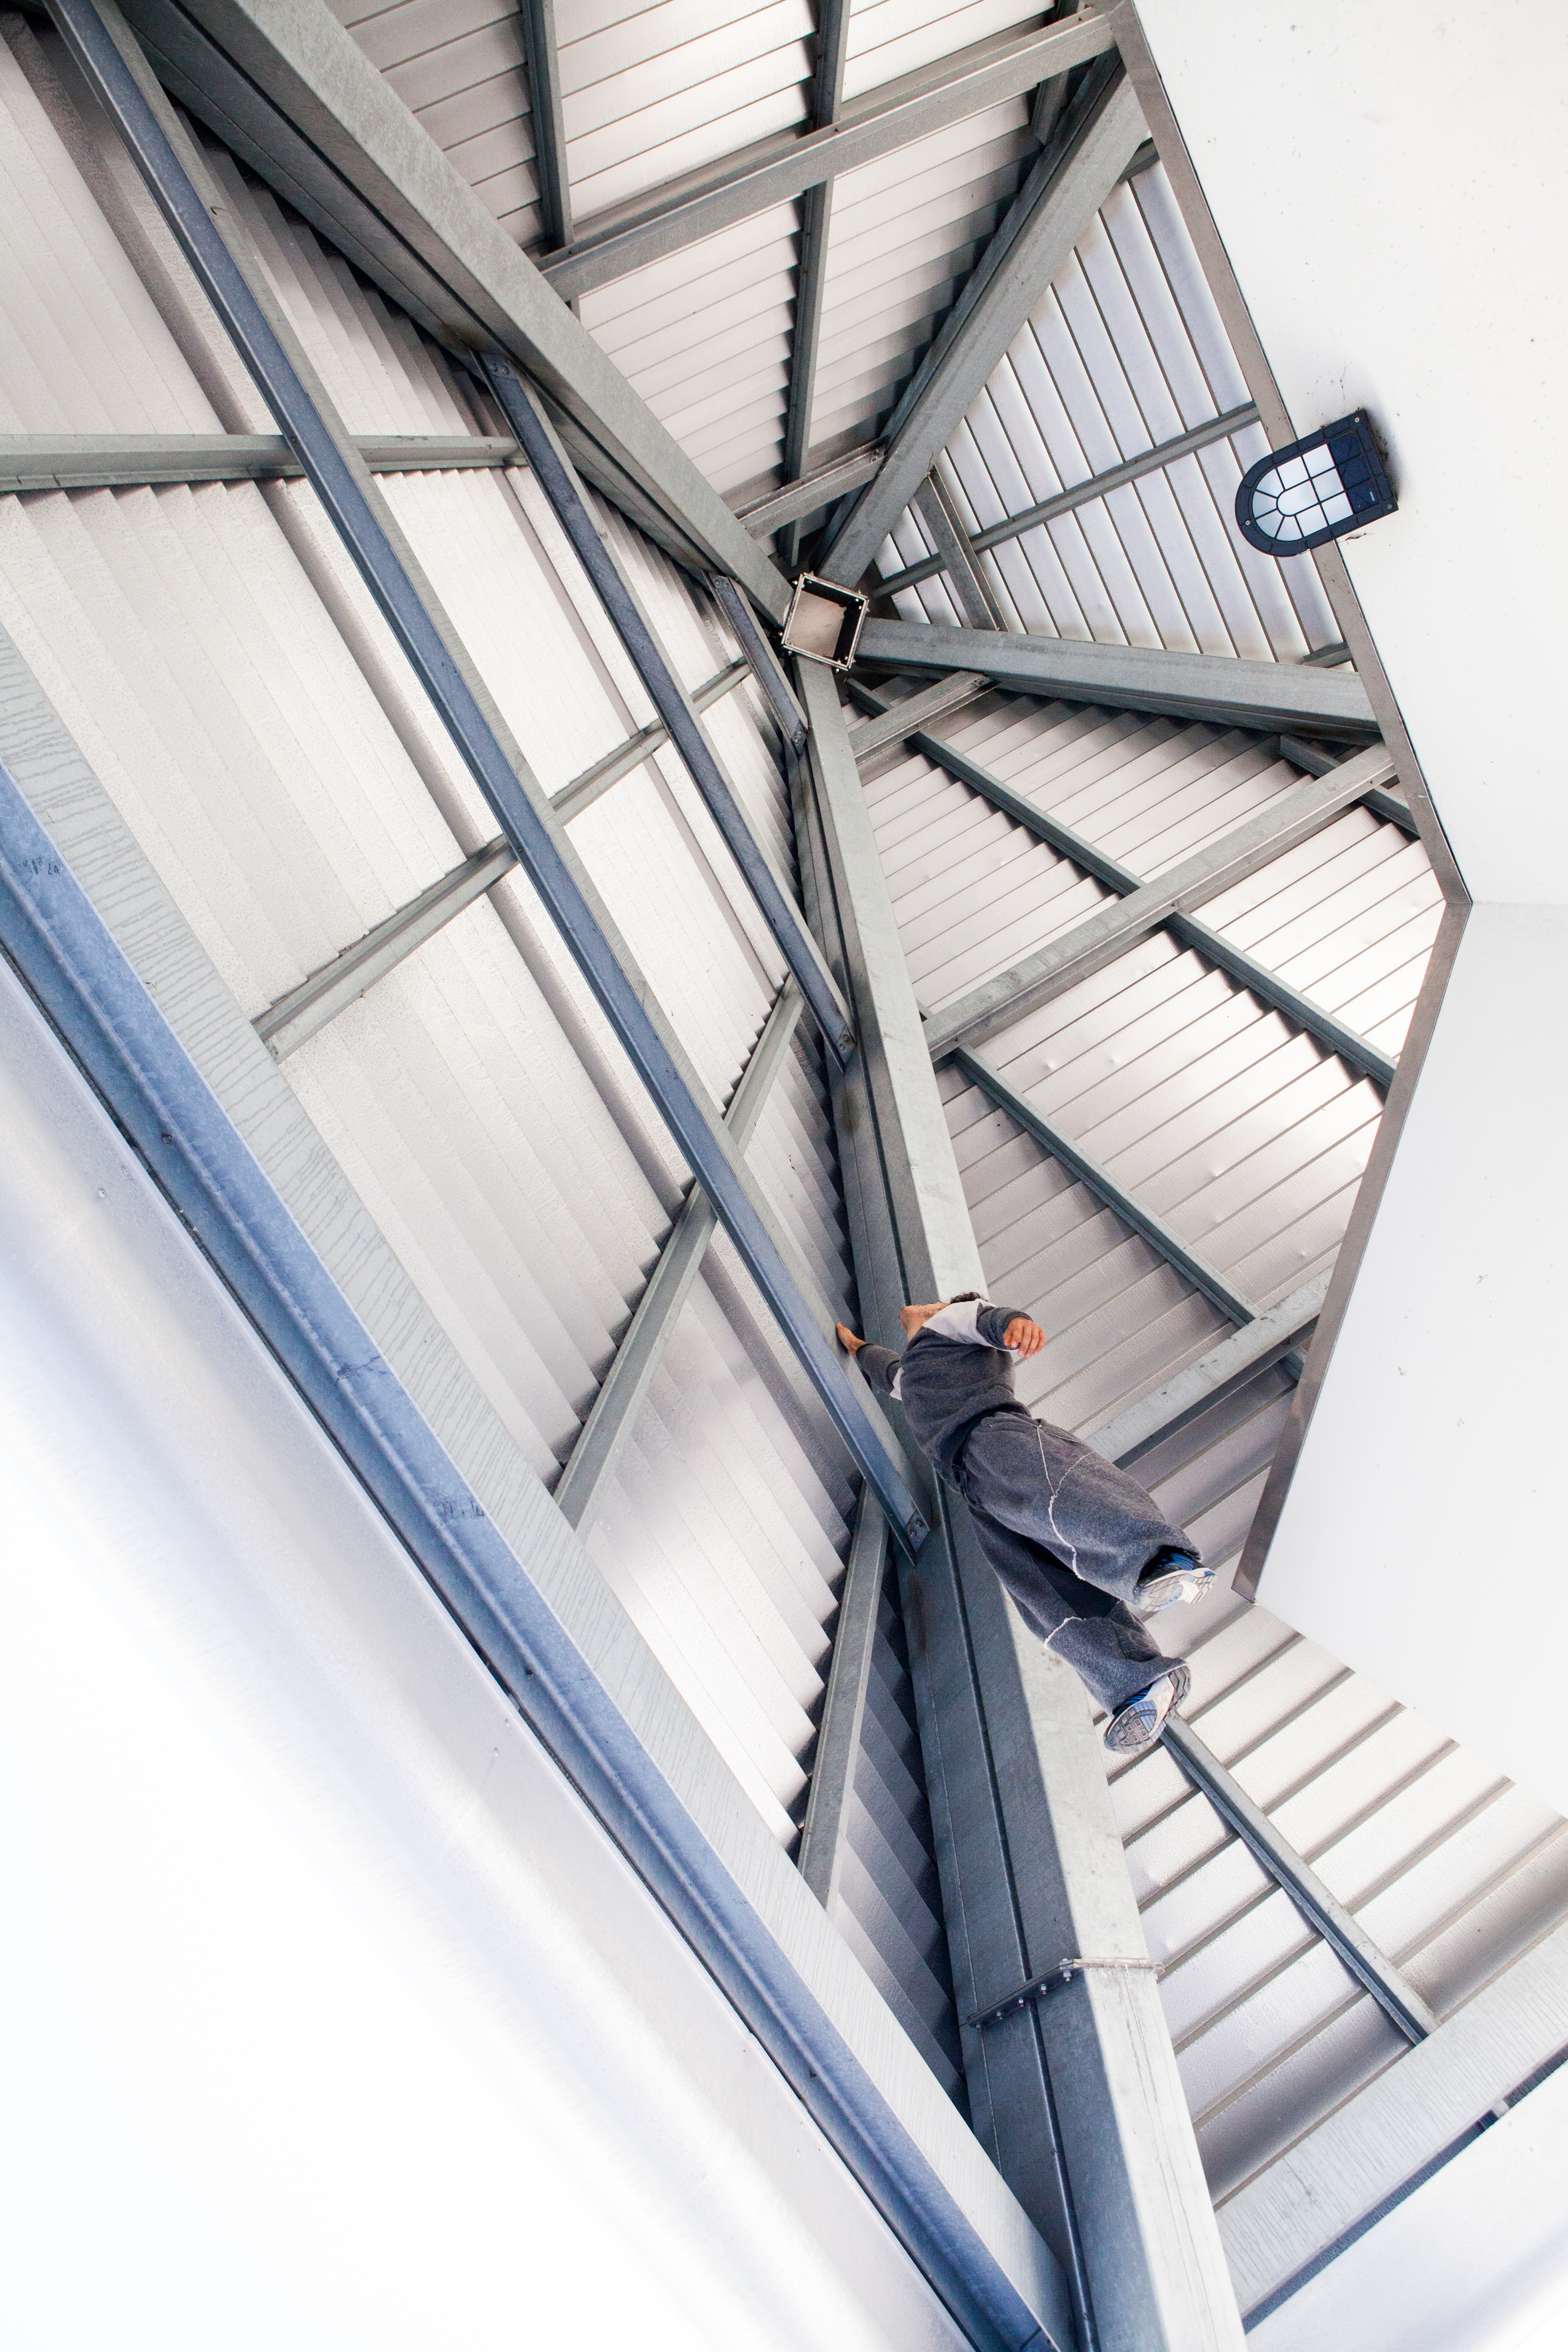
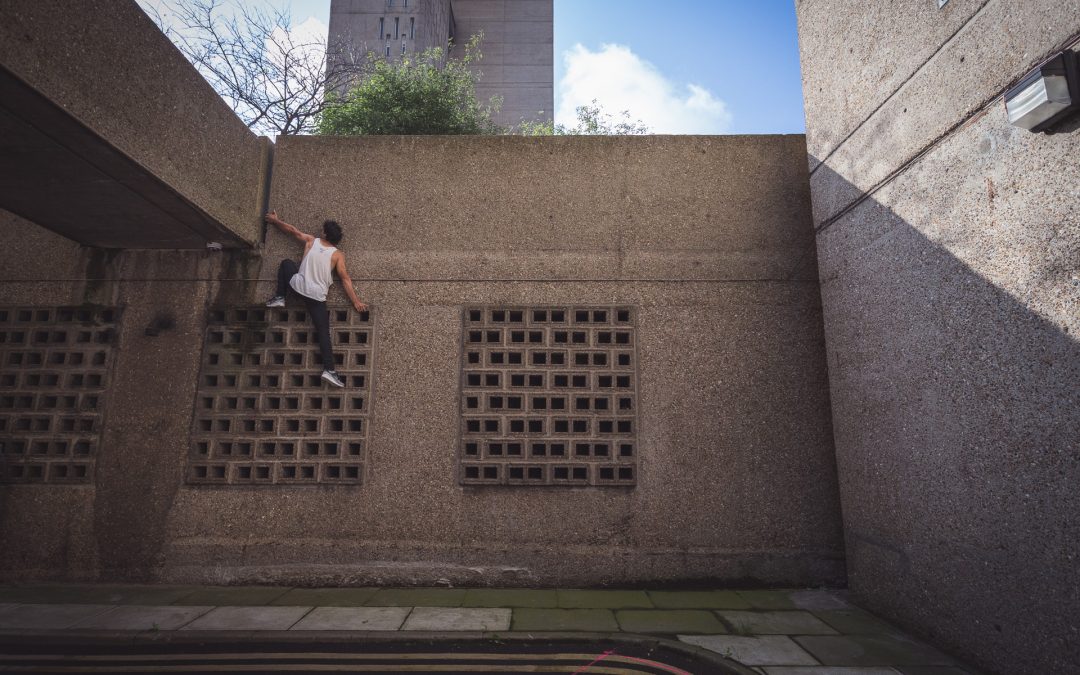
Picture by Arianna Barbin, in a photoshoot for Skochypstiks 

I consider height exposure no different than an immersion underwater (freediving). You need to learn how to get comfortable with being in the water first; learning how to manage your resources: oxygen levels, time, energy, surroundings and emotions, to name a few.

From there, you can swim around and progress to different stages or layers of immersions: 3-5-10-15 meters and so on…

After many hours spent practicing and only once you are ready, you can perform proper tasks. I.e. Exploring an underwater shipwreck.
However, if you get to that level, everything else will certainly be covered and you will be able to make the practice of water immersion yours.


This metaphor remains when thinking about the necessity of a gradual state of exposure. If you dive deep too fast or too soon, it won’t work. Your air won’t last, you would be wasting energy, you would not handle the stress. An “acclimation” phase is necessary for sustainable development.

Following from here, the basic stages on a first phase that I have isolated on a fear exposure are three:

– Static progressions

– Dynamic progressions

– Task orientation

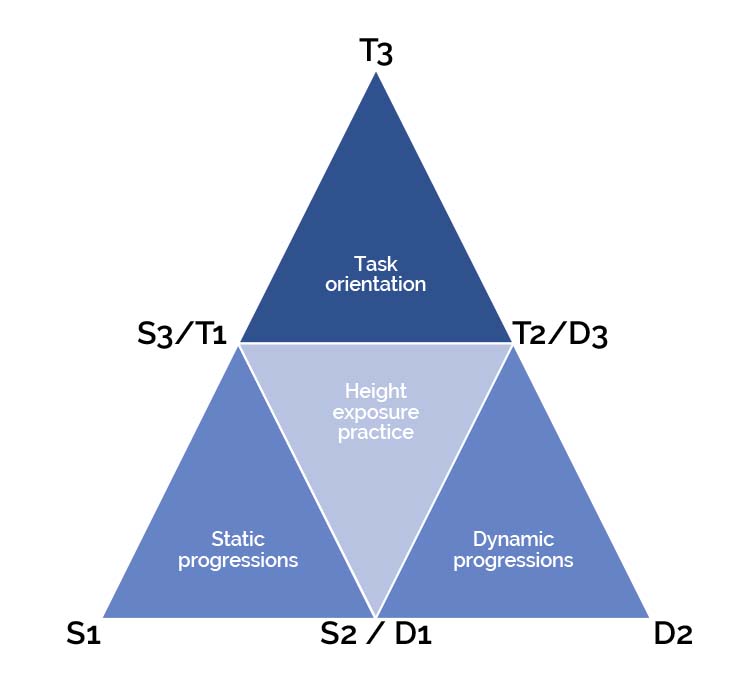
In the diagram, you can see the progressions for any situation a person could possibly encounter during the height acclimation journey. Once adjusted by the level of preparedness, each stage can provide enough exposure to trigger a positive adaptation.
The figure is composed of three different pyramids combined; one of the static progressions, one of the dynamic progressions, the task orientation one.

The static pyramid < the dynamic pyramid < the task orientation pyramid.

At each corner, you can see the three stages, based on the typology of the drill; 1,2,3. It is progressive starting from the lower left corner and from there in a counterclockwise direction.

I.e. S1

Interestingly, S2 appears in combination with D1. S3 with T1. T2 with D3. Therefore, the whole progression appears to be slightly scattered.

It doesn’t appear to be just linear S1-> S2 -> S3 -> D1 -> D2 -> D3 -> T1 -> T2 -> T3.

It can be more variable: S1-> S2 -> D1 -> D2 -> S3 -> T1 -> D3 -> T2 -> T3. This highlights complexity and fluctuation in progression.

  1. Static 1 (S1): Static Comfortable Position

I.e. standing on a wide surface with no protections around. Lean forward – lean backward, exploring the boundaries of balance. Spend time in stillness until all symptoms of vertigo diminish. Find a higher place, repeat.

  1. Static 2 (S2): Static Uncomfortable Position

I.e. hanging on a high wall with a little buffer to failure, performing some static positions on a rail without moving at height etc.

  1. Static 3 (S3): Static Drill-Based Exercise

i.e. passing a ball at height with a partner, catching and throwing without moving, scanning for options.


  1. Dynamic 1 (D1): Dynamic Comfortable 

i.e. walking on a wide wall at height, back and forth, turning 360 degrees, doing small jumps on the spot, etc.

  1. Dynamic 2 (D2): Dynamic Uncomfortable

i.e. locomoting on a rail at height, performing a traverse on a high wall.

  1. Dynamic 3 (D3): Dynamic Drill-Based Exercise.

I.e. Walking forward on an edge at height with a partner. The two people should be connected by a stick from the belly of the first one to the back of the second one. The stick should not fall.


  1. Task Orientation 1:

i.e. walking the perimeters of a building in a circle.
(The task to perform should be easy, manageable, replicable at ground level)

  1. Task Orientation 2:

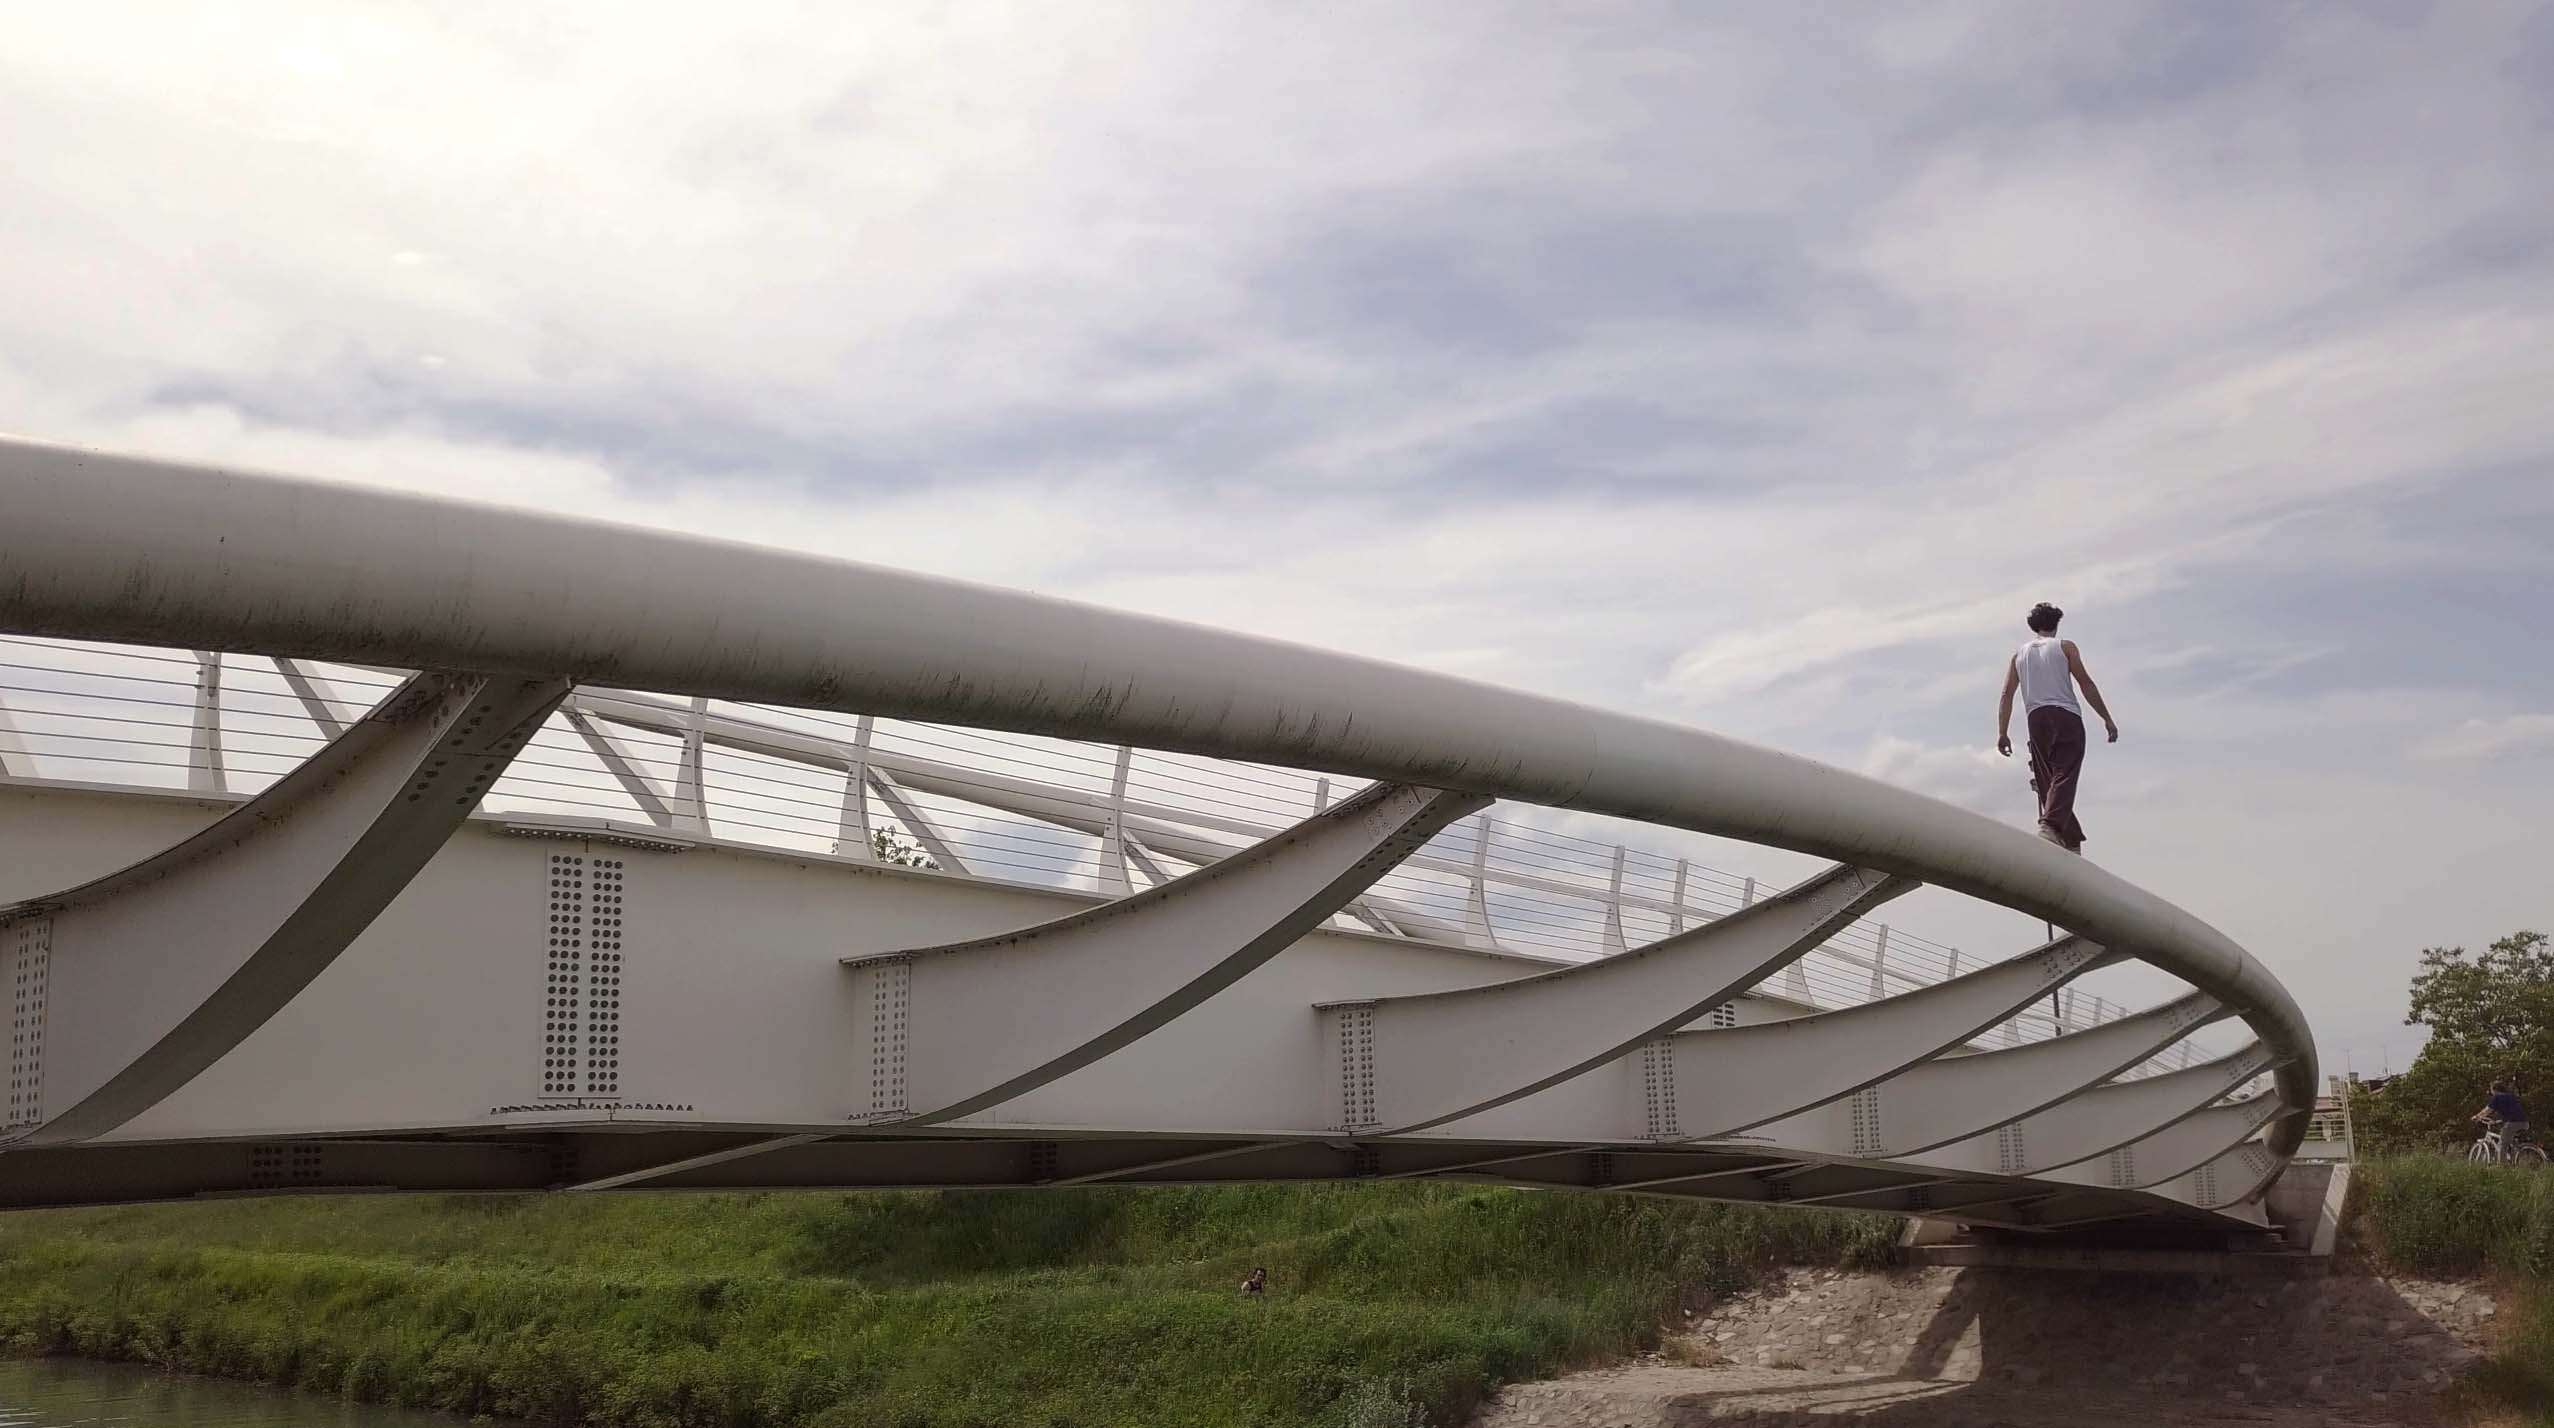
i.e. Climbing a bridge perpendicularly in the middle with water or the void underneath. The task can also be completed safely on the side as a preparation first.

(The task can be performed on the side).

  1. Task Orientation 3:

i.e. performing a jump at height between two surfaces that cannot be tried before (aka. In parkour it is referred to as “breaking a jump”), free solo a climbing route.

(It should not be possible to try the task beforehand, there is no way back once you are in the middle of it).


Make sure you don’t skip the stages for acclimation, nor you regress too much. Be brave, be true, be smart.

Until next time,

Marcello.

The Perceived Fear Scale

The Perceived Fear Scale

The parkour legend Chris “Blane” Rowat balancing on a rail in London. Summer 2017, a hot day, photoshooting for Skochypstiks. Picture by Andy Day.

“If you stare into the abyss, the abyss stares back at you” – Nietzsche

Humans’ perceptions and instincts are inner signals that can and should be trusted. If you feel you are thirsty, you probably need water. If you feel like something is wrong, it probably is.

Human states have been vastly investigated in the literature. Either in the form of models or scales, they all tried to frame a specific condition considering the individual perceptions produced during the direct stimulation.

These methods of measurement have been implemented in psychology, business, physical activity and so on.

In Powerlifting Mike Tuchscherer proposes a method called Reactive Training System (RTS) which is based upon a rate of perceived exertion (RPE). The RTS puts into a relation the RM percentages for a given lift with the number of repetitions that can be performed with a training weight. Its applications are endless – from autoregulating training based on fatigue to developing a better sensitivity with different loads. (if interest in its limitations click here). Similarly, the classic Borg scale is in an RPE system that is used to measure cardiovascular effort by guessing it subjectively in due course of an activity. It can be used in different forms of testing or as a training tool.


Same Photographer, situation, place, time. See above. However, this time it’s me climbing a rusty tower.

 In psychology, different scales have been developed for research and treatment purposes in clinical contexts. Usually, they are validated through extensive testing and a bit more complex than the basic ones seen above.
Just to name two: The Hamilton Anxiety Rating Scale (HAM-A) is used “to assess the severity of symptoms of anxiety” (you could guess right?), and The Perceived Stress Scale (PSS) that examines the chronic and the acute state of the art on this topic. Down here you click on the elements I am talking about:

Etcetera. Of course, they require a minimum of tuning and in the beginning they can be imperfect or misleading, but with time they can become really nice tools in the box. If implemented right they can provide some clear internal picture for a given state.

For example, trying to make more quantitative the degree at which an internal emotion is expressed (such as acute fear) can used for exercise selection during practice.

So, check this out: 

So let’s put this straight into practice.

When setting up a session of familiarization with fear, you should be working between four to eight PFS-RPE. It doesn’t matter what you do as long as you stay true to the scale. Be honest. You might need to regress your sessions a lot or to move them forward according to the stage you are at. Don’t assume you are at a certain stage forever since things change from session to session and we evolve from moment to moment.

Try to assess the current stage you are in a certain condition and move from there.

Gradually progressing into the scale will require a long time, so to make it sustainable – stay in a state you can sustain for a long enough. When training to better handle basophobia (fear of falling) or acrophobia (fear of heights) for example, the time spent at height is everything. You might think you did a great session because the emotions you felt were very intense, but the actual time spent up there might have been too little, therefore the session becomes poor.

The trick to progress in this game is a constant gradual exposure. Start from a manageable drill, work through it, make it harder until even the hardest variation goes from an eight to a three; then start over. On a preparation layer, this is what I call acclimatization to heights.

But, don’t stop here. From time to time retest your skills on a reality base.
This is what makes parkour, climbing, fighting so interesting to my eyes, you can test your level on your skin where the words don’t mean as much as the actual act of doing.

I.e. you can balance on the floor. You can stand at height. Now, be brave, balance at height. There is a lot of learning waiting for you there.

More insights, next week.

Marcello.

The risk’s illusion

The risk’s illusion

Picture by Andy Day – summer 2017, in a photoshoot for Skochy, London.

You know what is the biggest problem when it comes to facing fears of all kinds? It’s hard.

I do not mean slightly difficult, but extremely tough.

Your body would try all that is in its power to avoid facing them and it will try to protect you in any possible way.

You think you are tired, busy, simply not ready. Not today, not like this. These are all excuses; protective mechanisms at their finest, trying to trick the mind to avoid putting yourself at risk.

Why? In an evolutionary sense, fear protects you from a potential death, that would also imply an inability of transmitting your genes to the next generation (1). One of the most valuable tools in a nutshell. As easy as that.

The body knows, you know, we all know – deep inside.

This may become a problem when the “fear of fear” is installed in people’s minds, creating as consequence illusions and misperceptions (2). Not experiencing fear while stepping into the world of risk can limit possibilities and discoveries. But how can we approach risk without blindly stepping into the darkness and getting irremediably hurt?

Follow me here.

For a given risk, only one performance outcome is possible, and that is relative to the individual level of preparedness.

This means: accept your state and what you can do. Move from there. Regress the scenarios to your possibilities.

The illusion lies in looking into situations that are too hard for an individual’s level of preparedness without adjusting them by a possible and realistic and controllable risk. Stepping over that line should not be an option.


For example: if it’s hard for you to climb a 5.2 (YDS), you don’t even think about free soloing El Capitan. It is simply not in the frame, it is way beyond it.

I am not saying don’t dream big, but keep the feet well grounded when walking your path.

Fortunately, the more a person navigates into similar situations, the more the perception of risk will match that of the real risk; revealing valuable scenarios for development. But like everything, it comes with practice.

You know Black Mirror’s “Arkangel” episode (4)? The mother that wants to control the daughter at all costs altering her perceptions to protect her from anything? Well, (spoiler alert) it doesn’t end well, doesn’t it?

Get the right amount of risk exposure, tune in your perceptions.


Mental Preparedness:

So, it appears clear that if you want to step up the game and access a wider range of possibilities you need to increase your preparedness. How? I’ll make it general now, and elaborate more in the future:

expose yourself to a variety of scenarios and gain experience;

widen your capacity and increase your skill set;

learn how to better handle your emotions.


As you wait for some more insight, don’t get too cautious and make mistakes: smaller traumas protect us from bigger and more profound ones. As I use to say when I teach impacts management, there is a difference between Eu-traumas and Dis-traumas.

Eu = positive stress -> will make you grow.

Dis = negative stress -> will destroy you.

Get the Eu, discard the Dis. Don’t get injured, but don’t stop for a few scratches, it’s all part of the game.

To summarize:

Tune in your risks perception by gradually exposing yourself out of your comfort zone, experiencing fear. Let it guide your choices, let it protect you, help you, give you an advice when nobody else can.

Be careful not to fall into the illusion that there are more situations for a single state of risk and preparedness.

Then, increase your mental preparedness by gaining experience, increasing your skill set and learning how to channel and control emotions.

Is this getting any clearer?

Good. Next week I will present the acclimatization and the shock method to fear via height training and I will give you a practical scale that can be used to determine your level in the journey.

Until next week,
-Marcello. 

Want to get some important info from me now and then?

Just the best and the most selected because I hate spammers as much as you do

References:

  1. Dawkins, R. (1989). The selfish gene. Oxford: Oxford University Press.
  2. Reiss, S., Peterson, R., Gursky, D., & McNally, R. (1986). Anxiety sensitivity, anxiety frequency and the prediction of fearfulness. Behaviour Research And Therapy, 24(1), 1-8. doi: 10.1016/0005-7967(86)90143-9
  3. Arkangel (Black Mirror). (2018). Retrieved from https://en.wikipedia.org/wiki/Arkangel_(Black_Mirror)